> ## Documentation Index
> Fetch the complete documentation index at: https://docs.hellorecruiter.ai/llms.txt
> Use this file to discover all available pages before exploring further.
# Take-Home Follow-Up Call
> What to expect from the short call after your take-home assessment, where an AI interviewer asks you to walk through the work you submitted.
Some take-home assessments end with a short follow-up call. An AI interviewer opens the work you just submitted and asks you to talk through a few of the choices you made. There's nothing new to prepare. It's a conversation about something you built.
**Video walkthrough coming soon.** A short video showing the follow-up call from start to finish will appear here.
## Will I Have One?
Your assignment page tells you before you upload. It shows one of two things:
| Your assignment page says | What happens |
| - | - |
| **Opens the moment you upload** | The call is ready as soon as your upload finishes. Start it right there on your assignment page, within **30 minutes**. |
| **Only if we ask** | You might get a call later. If the hiring team asks for one, you'll get an email with a link and a date to join by. You have **48 hours** from the email. |
If your page mentions neither, your assessment doesn't include a call.
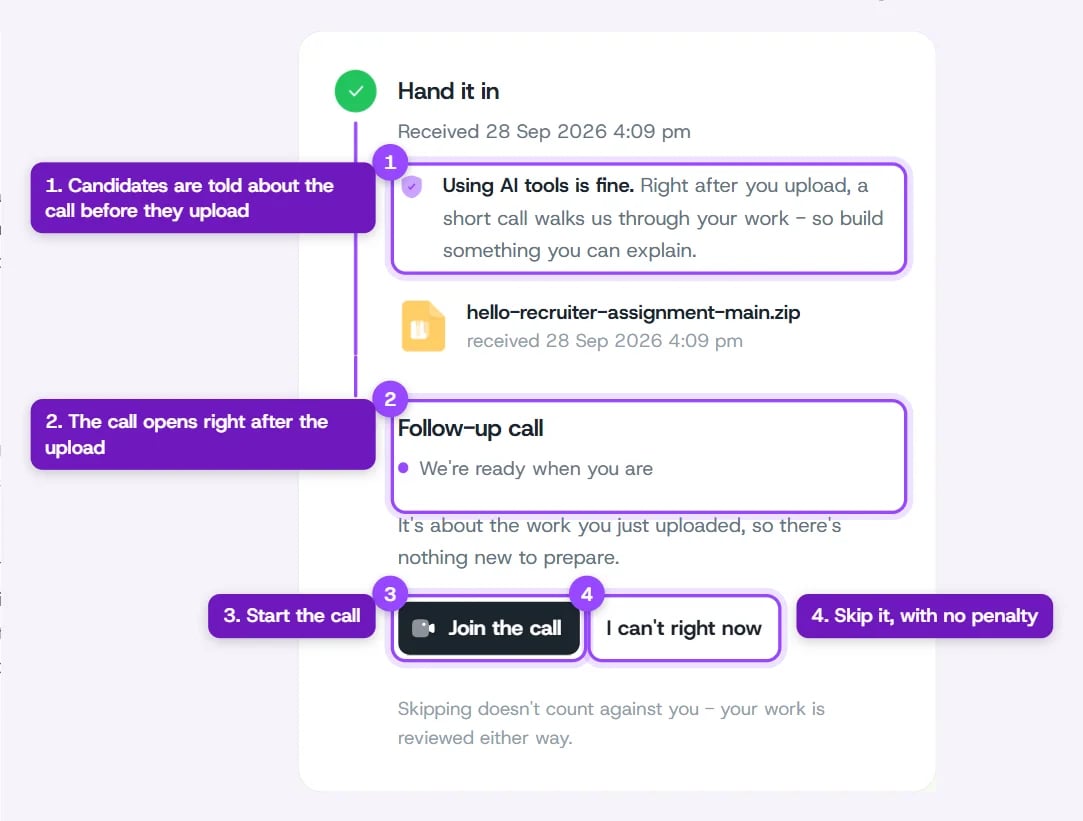 If the call opens the moment you upload, only submit when you have about 20 free minutes to talk.
## What to Expect
* **About 20 minutes.** One conversation, nothing to prepare.
* **About your own work.** The interviewer has your files open and asks why you made a few of the calls you made.
* **Camera on, no screen share.** You don't need to show your screen. Headphones help.
* **You can see what it's looking at.** During the call you can open your files and a live transcript.
The best preparation is building something you understand and can explain. You don't need to memorize anything.
## Joining the Call
Use the page you uploaded from, or the link in your email if the hiring team asked for a call.
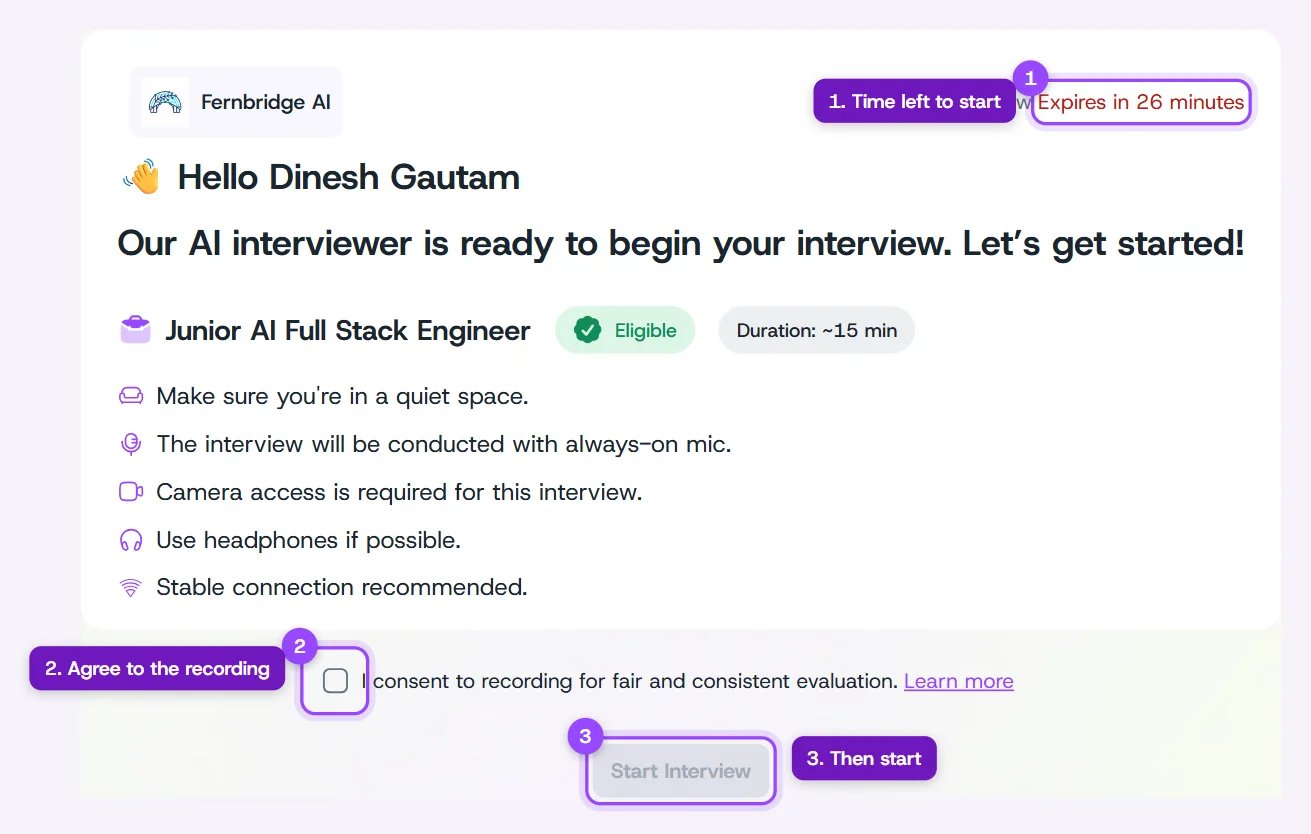
You'll land on a short welcome screen that shows how long you have left to start.
Tick the box agreeing to the recording, then click **Start Interview**. Allow camera and microphone access when your browser asks.
You can run a quick microphone test, or skip it with **Not now**. Then click **Join Interview**.
Answer the interviewer's questions in your own words. It's fine to say you'd do something differently now.
When the interviewer wraps up, you'll see **You're all done**. Press **End interview** to close the room.
If the call opens the moment you upload, only submit when you have about 20 free minutes to talk.
## What to Expect
* **About 20 minutes.** One conversation, nothing to prepare.
* **About your own work.** The interviewer has your files open and asks why you made a few of the calls you made.
* **Camera on, no screen share.** You don't need to show your screen. Headphones help.
* **You can see what it's looking at.** During the call you can open your files and a live transcript.
The best preparation is building something you understand and can explain. You don't need to memorize anything.
## Joining the Call
Use the page you uploaded from, or the link in your email if the hiring team asked for a call.
You'll land on a short welcome screen that shows how long you have left to start.
Tick the box agreeing to the recording, then click **Start Interview**. Allow camera and microphone access when your browser asks.
You can run a quick microphone test, or skip it with **Not now**. Then click **Join Interview**.
Answer the interviewer's questions in your own words. It's fine to say you'd do something differently now.
When the interviewer wraps up, you'll see **You're all done**. Press **End interview** to close the room.
 ## Inside the Call
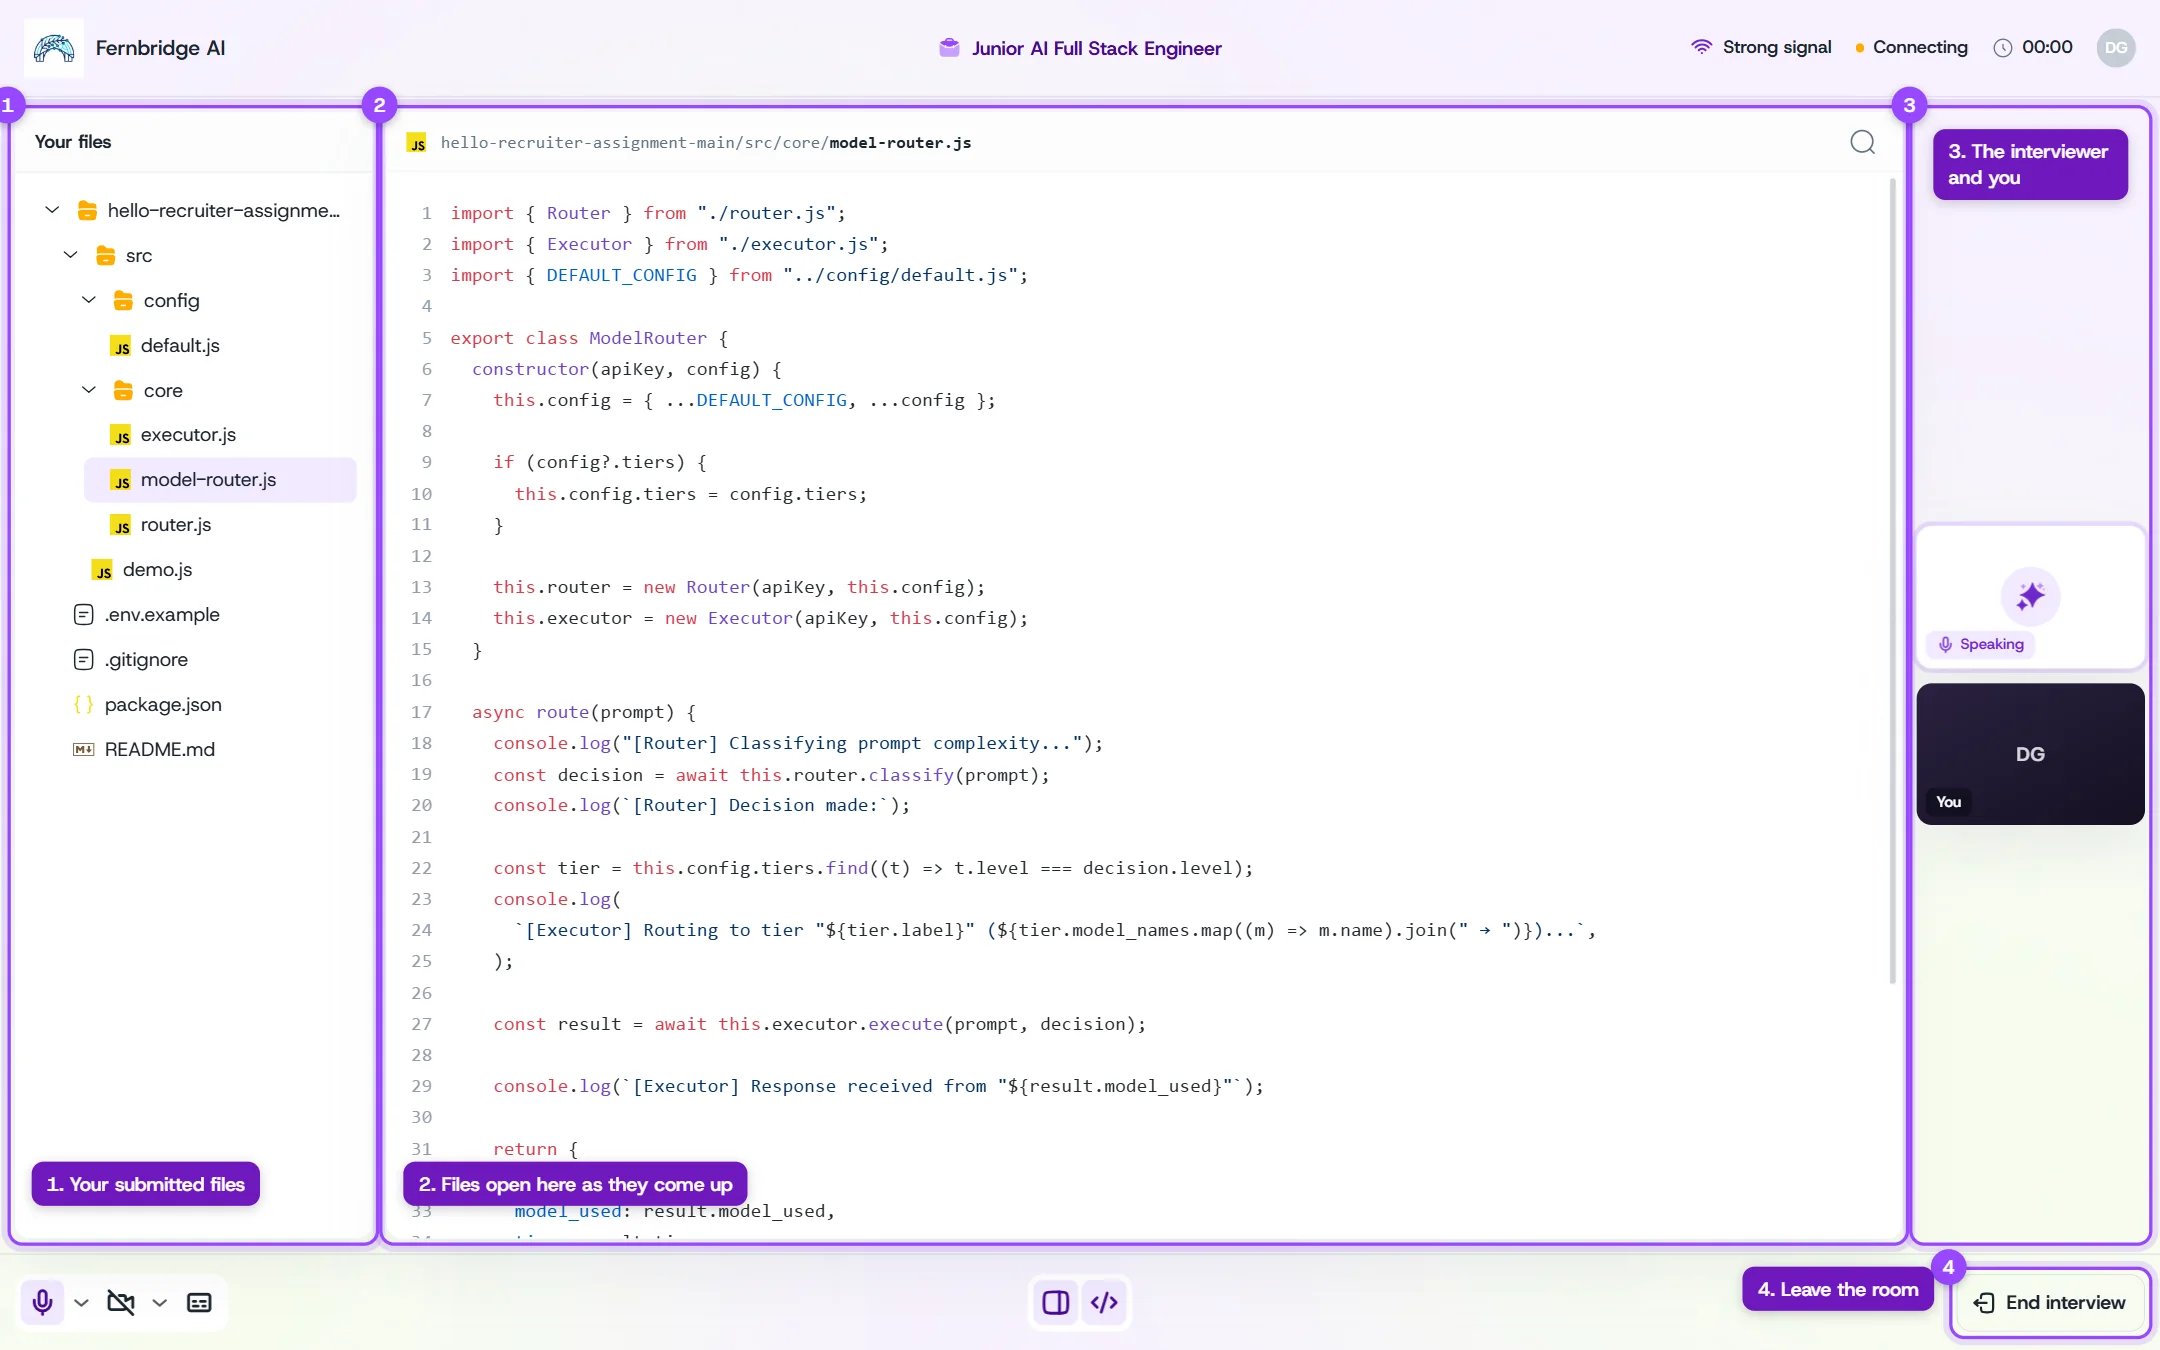
Your files are on the left. When the interviewer brings one up, it opens in the middle so you're both looking at the same thing, and you can open any file yourself too. The interviewer and your camera are on the right. The buttons at the bottom show or hide your files, your code, and a live transcript.
## Inside the Call
Your files are on the left. When the interviewer brings one up, it opens in the middle so you're both looking at the same thing, and you can open any file yourself too. The interviewer and your camera are on the right. The buttons at the bottom show or hide your files, your code, and a live transcript.
 Having trouble with your camera or microphone? See [Camera & Microphone](/troubleshooting/camera-microphone) and [Technical Requirements](/candidates-guide/technical-requirements).
## If Now Isn't a Good Time
If the call opens and you can't talk, click **I can't right now**. **Skipping or missing the call never counts against you.** Your assignment is saved and is reviewed either way, exactly as you submitted it.
If you were expecting a call and your assignment page says **We couldn't get it ready**, you don't need to do anything. Your assignment is safe and will still be reviewed. Reach out to your recruiter if you have questions.
## After the Call
Once the call ends, your assignment page shows **All done**. The team reviews your submission and the call together, and your recruiter will follow up about the next step.
## Related Guides
This documentation is built and hosted on [Mintlify](https://mintlify.com), a developer documentation platform.
Having trouble with your camera or microphone? See [Camera & Microphone](/troubleshooting/camera-microphone) and [Technical Requirements](/candidates-guide/technical-requirements).
## If Now Isn't a Good Time
If the call opens and you can't talk, click **I can't right now**. **Skipping or missing the call never counts against you.** Your assignment is saved and is reviewed either way, exactly as you submitted it.
If you were expecting a call and your assignment page says **We couldn't get it ready**, you don't need to do anything. Your assignment is safe and will still be reviewed. Reach out to your recruiter if you have questions.
## After the Call
Once the call ends, your assignment page shows **All done**. The team reviews your submission and the call together, and your recruiter will follow up about the next step.
## Related Guides
This documentation is built and hosted on [Mintlify](https://mintlify.com), a developer documentation platform.